Saturday, November 13, 2010

ATCs swaps


I have been swapping very happily through 2 yahoo groups: Art4mail and Surface Design.
I am also a subscriber to Atcsforall and thought the illuminated letters looked like something I would love to do.
These had to be hand drawn or handpainted.
I struck nothing but obstacles: I tried it on canvas paper and they looked seriously crappy.
I need a US$1 note and can't get 10 anywhere. Not the postoffice, not my bank. Then I did the hand drawn ones, they are here and I am disappointed in them as well.
Oh well....I haven't put my ATC label on the back, so now I have to wait till maybe someone whose first name starts with E, F, G or H has a birthday!
Deep sigh: should have stuck to my medium of choice although I have to say, I did enjoy making them, I just don't think they have been done accurately enough....

Thursday, October 21, 2010

Paper-cloth

I went to the Craft Show in Brisbane yesterday which was terrific and very inspiring.
Of course, had to buy some beads, some  packets of luscious fabrics, threads, book.
One book Stitch Alchemy shows a technique to create sheets of paper-cloth.
Basically, you put a piece of fabric on some freezer paper, slap some diluted white glue on it and cover it with strips of paper. The resulting sheet can be used to paint, stitch, embellish, cut..whatever.
I did 3 today.
#1: gold tissue paper and the handmade paper our washing came back in when we were in Bali many years ago plus some junk mail.
#2: a no longer required dressmaking pattern
#3: I used pastels to colour ordinary printing paper and added a paper serviette and some coffee crystals.
The sheets are about A3, but I could only scan part of them.


#3
 

#1


#2

Unfortunately, I cannot seem to control where this pictures go.
What can I do with these sheets?
If I want to add stitching, these are nice and firm and need no further stabilizing.
Maybe I'll make some bookmarks? Some ATCs? acrylic paint? 

Sunday, October 17, 2010

Mungo Dreaming

And here it is!
Thank you Tessa and Neville Wright for taking the photograph.
I am very happy with it. It does what I want it to do: tell a story, pull people in, wondering what it is all about. When they look closer, they wonder more: what is it?
Enjoy!
The frame is pretty cool too and I was happy with that as well and a photo will be posted.
Although....does anyone read this blog?????

Saturday, September 11, 2010

Down to Earth

Whenever I am "told" I have to make something for an exhibition, I usually start by feeling annoyed and like " I don't want to do that". But often, those events were the start of work I was very happy with.
And this is what happened this time.
The outdoor exhibition is called "Down to Earth" and you have seen the tree art that I made.
But slowly another idea started to take shape and this time I just went with it without too much pre-planning or even drawing.

I had some hand woven wool that I frayed and layered. There was going to be a line that indicated the division between under and over the soil and from there I let myself be inspired by my "stuff".

I rolled some paint on the wool before I attached anything and even did some monoprinting, where I created grass on allfoil with acrylic paint, then turned it over onto the wool and rubbed the paint down.
You really need to see the closeups of the "digs" the right one has small piece of bones and even some teeth.
Well may you ask: teeth of what?
I don't know: we found a little skull, maybe it was a wallaby or maybe a hare. I took some of the teeth out and sewed them on.
On the left hand side are pieces of shell.
The stitching I did was very free,  after my spell trying to learn painting, it turned out to be like painting with thread: stitching some grass for example, then adding shadows and highlights.
This is the most fun I have had for years with a project.

I bought a picture in a frame on the market and I will use that to frame it, but it needs some work to make it look "earthy" enough. I probably will use impasto gel medium, find sand and maybe some other stuff and I will be a good girl and test the process first on a board I have.

Monday, August 30, 2010

Finished Leaf ATCs


Unfortunately, the pictures don't do them justice. The satiny black background caught the light of the scanner and the glitter is no where as interesting as in real life.
I tried to photograph them and that was even worse than the scan!
I hope the recipients are happy with them and I hope I get some nice ones back.

Sunday, August 22, 2010

the fun about making ATCs

A friend asked me: " why would you make beautiful things for strangers?"
My quick reply was: " it isn't just about giving, it is about receiving beautiful things in the mail from all over the world"

But there is much more to that: because ATCs are so small, signing up for a swap of 10 isn't too overwhelming and that is what I have done. The theme is "Leaf".
First I found a piece of peltex (it could have been fast2fuse) in my stash. I had bought some black rayon satin and I fused it to one side.
Next decision: put an all over quilting pattern over the lot or cut them apart now?
I decided to cut them apart. The only guideline in the swap was: think of the composition and I reasoned that by working with a 3" x 4" piece, that would be easier. Because heavy stitching can distort a piece, I always cut a work a bit bigger, then trim it to size nice and square ready to finish the edges.


I had 10 pieces, black satin-ed. I started to free motion some leaves on a couple of them. I added some embellishments to a couple. But soon I was getting bored and needed to look for something different.
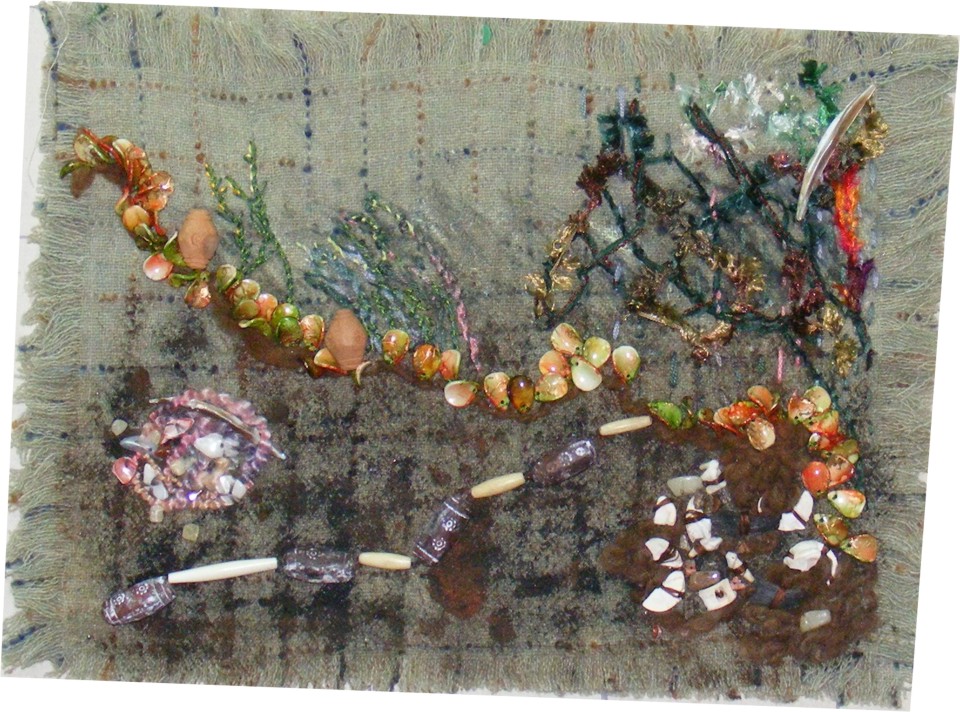
Rummaging through my stash I found a piece of rust felt. I cut it into a leaf shape, stitched it on.
Mmmm....what else does it need? Found some thick yarn and stitched that on. I work on a Bernina and have a cording foot: it has a hole in front to feed the yarn or cord through, so that you just stitch and it attached the cord easily. I used clear thread through the needle, but in the past I have done that using metallic or complementary colours.

It still needed something else and I stitched on some "chips". Chips are little piece of stone with holes through them. I have them in a number of colours, I used the pale ones to bring some light in what was a fairly dark composition.

Here are the 4 in progress pieces. I'll take a proper photo when they are finished.
When you do ATCs, you'll have to do a back.
It needs some info on who you are.


 You can print them on card, but I printed these on cotton.
No address as we are changing back to a postbox soon.


Friday, August 20, 2010

ATCs

That stands for Artist Trading Cards. They are 2.5" x 3.5" . They are fairly easy and quick to make, much quicker than fabric postcards and you can swap them.
I have joined a few different swaps, but I'll share with you some old ones I did. I didn't actually swap them, but just gave them away.


You get the idea.....

Saturday, August 14, 2010

Sorting my bead collection

Well, that took ages. I kept finding more containers.
But it is looking good now.
This is my worktable in the middle of the process.

Tuesday, July 13, 2010

Next projects

I was gently pushed into making an entry for the Glen Rock Quilters' Challenge: Wine, Roses and All That Jazz.
I agreed, because I happen to have something already half made!
This
This is a quilt made with gold fabric, music fabric for the binding and for a previous exhibition, I temporarily attached some postcards. They were a gift and I had to give them back, but I still have this quilt.
Unfortunately the gold organza I used cannot stand the heat of the iron necessary to have something fused to it.
But I can make some elements and just hand stitch them on.

The deadline after that is "Down to Earth" I don't want to make anything that takes too long. Painters are lucky in that respect, they seem to be able to do a painting in a week with lots of time to spare.

At the moment, my thoughts are going to a snake. This is an outside exhibition, could I make a fabric snake that curls and that can be hung from a tree?
What if: I cut a wide spiral out of fabric, wide enough to stitch the edges together, stuff it to make it into a kind of spirally sausage??

I can then decorate it with stitching, beads and whatever.

Monday, July 12, 2010

Sunday, June 27, 2010

Stitching the gloves on

This is a bit of a boring job, but it does look nice. Better than if I had been able to use a machine stitch, which was my original intention. I couldn't do that, because the foot doesn't move freely over the kid leather. I believe it needs a roller foot, which I don't have and don't want to buy.
What I do like is whipping another yarn through the stitches so, even before I finished the stitching, I am experimenting.

This is a relative fine thread that can be used with an embroidery needle.


This yarn is much thicker and I had to use a big needle with a very big eye.
It hides the original red stitching a bit more, it is marginally harder to use.
What does show well on these photos is that the kid leather is very fine and I am conscious that it really IS skin as I push the needle through.
I think I will be going with the finer thread.
I bought the yarns, threads and some fascinating fabrics at the Textile Art Festival in Brisbane last Friday.
Threads and yarns from The Thread Studio and fabric from  Beautiful Silks.

Also bought a "Studios" Magazine.  Our house is for sale which means that, eventually, we will move into another house and I have an opportunity to redesign my sewing studio. I like the one I have, because although it is only small, we had the house built to our specs, so I have been very happy with my sewing studio, which, in fact, I have always called my sewing "room". As we very likely will move into an existing home, I will have to work with what I get!

Friday, June 25, 2010

Background

This is the background, in other words: 3 layers with stitching.
Here is a close up.

I used part of Windmills of your mind to see if I could staple a quilt to stretcher frames, to get away from what I felt was an unpleasant way a quilt with various amount of density in the quilting, will hang.


You can't appreciate it here, but it is very effective and I have bought 26" stretched bars for this new work.

Sunday, May 23, 2010

Creating background

The quilt sandwich is made and is approx. 32" square.
Layers: Iron on interfacing on the bottom fused to bamboo wadding fused with paper backed fusible to the Dupion Silk.
I made templates of the outline of my hand in 3 sizes. (resized in CorelDraw).
25 Hand outlines are drawn on the back of the quilt sandwich, which is the interfacing.

I went through my threads and yarns and selected 2: an orangy hand spun silk thread, given to me many years ago by an 80 year old lady called Norma, a variegated jeans topstitching thread.
I made a test quilt the same as the main quilt and tried them out.

I liked the orange thread the best, with it slightly lumpy texture.

Saturday, May 22, 2010

Deconstruction 1 and 2

What if....
I opened up one glove, so I could applique it and see both sides at once?
This is what it looks like. Because you can't see the thumb, you can't appreciate how unpleasantly organic this object looks!


Next: just cut each glove in half, so I have 2 outside and 2 inside pieces.
OK, this was an experiment and I was very much prepared to sacrifice this pair.
I don't have to sacrifice the 4 pieces, but I learned NOT TO USE STEAM ON KID LEATHER!
It makes it shrink like plastic would.

Next step:
I have a piece of gorgeous magenta Dupion Silk for the background. Thought I could tuck it, but tucking needs more fabric than I have.

Tuesday, May 18, 2010

Gloves, gloves....

I bid on 13 pairs of ladies gloves on ebay and I got them today. They are just gorgeous: most are soft, kid leather, short ones, long ones, some are fabric, most are cream, one black, one brown, one midnight blue...or is that black?
Now I have to decide what to do with them. Of course, they don't all have to go into the next artwork...


Initially, my plan was to stitch some gloves onto a background quilt and then embellish them. I don't want a big quilt....

I am stuck at the moment....

Don't know about this one....

This actually looks better on the photo than it does in real life.
I used some paints and some crayons.

If I analyse this, I like the design, I don't like the execution, it is a bit too sloppy for me....

Monday, April 12, 2010

"Hand-in-hand"

This is the theme for the next exhibition of our art group to coincide to the multicultural festival end July.
What I would really, really love to do is create a chain of paper dolls into a Mobius strip that way, either 3D or drawing, but I don't have the technical skills to do either....If you don't know what a Mobius strip is, search images in google.

What I do have is the ability to make a paper doll chain and a quilt I do not want to keep as it is.

I have paints, mediums, a brayer, which is a hard roller to roll paint for block printing, but I am considering using the brayer to roll paint lightly over the quilt, covering to top layer, but leaving the deeper, stitched lines.

I can use the paper doll chains as stencils.....

Saturday, April 10, 2010

Maybe I can do something with this quilt?

We went to a wonderful art opening this afternoon of paintings and small scultptures.
Looking and chatting about art, I was thinking where to go with windmills. As it is, I definitely do not like it.
I don't like the development of the design and I hate the way the quilt isn't square.
Maybe I ought to get some paint and brayer and just roll some acrylic paint over it? Maybe I can add some medium to make it transparant?
Maybe i can cut the quilt up?
Here is the eternal question:
What if.......

Windmills of you mind...finished

Actually, I finished it a few weeks ago, ready for the "Musical Gems" exhibition.
Here are some images, thank you Tessa for taking the photos.

Am I happy with it?
Not altogether.
Once again I took shortcuts, was too lazy, too much in a hurry, whatever you call it, but I didn't set the printing on the organza, thinking, what the hell, I am not going to wash this quilt. No need for setting. Which only takes a quick rinse in detergent....

Then, when the quilt was completed, I wanted to flatten it.  Great, I know how to do that: spray with water, stretch and pat the quilt and let it dry....

Too late I noticed the printing on the text started to run....bugger....


I was lucky to find the hand, a piece I did last year for the Beatles card " I want to hold you hand" but when I had made it, it was too large. So that came in "hand"y!

What's my next project?
I bought some gorgeous fabric in PNG where we spent Easter this year and I want to make a tablecloth.
I left my camera in PNG, the family will bring it back when they visit in a few weeks. Until then, I cannot take photos.

Tuesday, March 9, 2010

That wasn't a good idea...

The fabric I am using for the triskele can stand only the coolest iron setting, otherwise it crinkles up.
Which means I can't fuse anything on it. :(
Apart from that: clock is on, keys are on and I am with that!

Monday, March 8, 2010

Background is done!

 
Lots of stitching, first the triskele was stitched with a blanket stitch, then the background was stitched in a free hand spiral design with variegated cotton "King TUT". 

Close up:

Sunday, March 7, 2010

Beatles Songs


This is another project ready for the Musical Gems exhibition. 
Some time ago, I made 40 weekly postcards, these are the ones that feature Beatles Songs.
The cards are attached with small buttons and beads, after the exhibition they will be removed and returned to the rightful owner.

Getting on with it!

OK, work has to be completed in 3 weeks, time to stop faffing about, just do it! Thanks Nike...good slogan.
Here is my todo list:
  • Clear work table
  • New needle in machine
  • Clean fluff from underneath stitch plate, maybe drop of oil
  • Stitch Triskele on. It is silver, but I'll use a grey rayon or maybe a contrasting rayon. ?Black??
  • Stitch on clock, stitch on balloon, stitch on apple.
  • Discard twisted score, don't like it anymore
By that time, the work itself will tell me what it wants me to do and I'll tell you about it when it happens!!

I also need to make a couple of placemats for meals-on-wheels, a commitment Glen Rock Quilters made and I want to start swapping ATCs.

I did some swaps in 2004! Must have been ahead of my time.

Sunday, February 21, 2010

4 elements

I was very happy with "footprints in the sand, until I pinned it onto the quilt sandwich, then the colour was far too bright.
I put a bit of organza over it, looked a bit better. You can't really appreciate the difference here, as there is a difference in exposure between the 2 and I don't want to spend heaps of time retouching the photographs.
I also would love to know how better to move pictures around on this blog, as you can do in other programs.

I am not sure where to go next, but I'll think of something!
Also my plan is to create a top layer on all of this, to make those elements much less defined.
I don't know if that is a physical layer, like organza, or a layer of embellishments, such as lots of musical notes scattered all over, which sounds like fun.
The first decision is whether to create more elements or leave it with these.


Monday, February 15, 2010

Ticky-tocky is finished


This is ready to be attached to the quilt sandwich.It will be like a circle, I'll cut the excess off just before I am ready to applique it. 

Sunday, February 14, 2010

Round...like a circle in a spiral

These are the first words of the song.


Here the music score with lyrics has been scanned in, twisted in Corel PhotoPaint. That design has been printed on cotton. It will be attached to the background with free motion stitching, keeping to the spiral design. 
Until I am ready to do that, I will put it on Vliesofix but I won't take off the paper backing till I am sure of where I want to put it.

Saturday, February 13, 2010

More ticky-tocky


It is looking good, isn't it!
I love the way the organza mutes the design of the fabric underneath. 
The stars are now defined.
Being able to design on the computer and print has made this element so much easier. especially the numbers on the clock. 
What I like about blogging this project is that, even though I think I am not getting anywhere, I can see progress.
I've ordered the wrought iron quilt hanger, I am committed to enter a new piece in the Musical Gems exhibition at the end of next month. Thank goodness for deadlines!
I am going to start on another element, while I consider how to design the hands of the clock with a sense of movement.  If I can't think of any way to get that effect well, I'll just put 2 hands in.....

Monday, February 8, 2010

Keys that jingle in your pocket

This element is now ready, except for the stitching onto the work. Lots of mucking about, mainly to find a solution to the problem of securing, which will now happen when it gets stitched onto the work.
What has happened here?
The original image was printed 3x on Extravorganza, cut out and fused on a piece of printed fabric. By shifting the image I wanted to create a sense of movement,
The smudges you see are bits of silver Angelina fibre. Not looking to good on here, but OK in real life.
I fused a piece of fine poly organza over the lot, catching the images and the Angelina.
You can't see it here, as this was scanned in, but the edges of the fabric have been frayed.

Sunday, February 7, 2010

Ticky-tocky

Which is what my youngest son used to call a clock.
 
I designed a clock face in CorelDraw. You cannot see it well, but each number is in a little pink 6 pointed star. I printed it on Extravorganza  which is a silk organza, then fused it onto a piece of furnishing fabric. While I liked the fabric, it kind of cancelled much of the stars the numbers are in, but I am going to bead the points.

Elements


Last year, when I was still thinking of doing this in drawing, I made this quick sketch in ink.
The images come from the text of the "Windmills of your mind" song.
"keys that jingle in your pocket"
"words that jangle in your head"
"like an apple, turning silently in space"
"a clock whose hands are sweeping past the minutes of its face"
"leave their footprints in the sand"
"or a carnival balloon"
"pictures hanging in the hallway"
The additional element is of sheet music, I'll probably do something with the actual sheet music and then manipulate it in Corel PhotoPaint.
  
I played for a few hours with this drawing, trying for an overlapping effect. I am going to print multiple images on organza, then overlap them on the background. Probably.... 
I have done quite a few works based on something musical and find it a never ending source of inspiration..


Thursday, February 4, 2010

Triskele is fused on!

After printing out the triskele for the 4th time, tiled over 12 pages ( or was that the 5th time?) I could finally get onto the next step.
My quilt sandwich was already made: 3 layers, 4 if you count Vliesofix: from the bottom up: iron-on Vilene, matilda's own wadding, vliesofix, ivory dupion silk.
Centring the triskele wasn't easy, I used Coreldraw to establish the correct position on the background and took my time.
Next steps: establishing elements and embellishments.
Next time I have to be in Toowoomba (probably to get the bikes serviced) I am going to order a hanger. My previous wrought iron supplier has closed shop, he recommended Forge Metalworks. When I rang, the lady said she was a quilter. Didn't ask if that means "mate-rates"!

Monday, February 1, 2010

36" x 34"

I discussed my dilemma about the size with husband Gerry. By that time, I had the size down to 24" so I could hang it from the wrought iron hanger I already have.
When I showed him the 30" triskele and discussed the impact I wanted to make, he suggested I go with that size and get a hanger to fit.
What he said was "You'll make it beautiful and it will be well worth getting a nice hanger for it"
Next I had to find the materials to make the base and a fabric to cover it:  I have the iron-on Vilene for the back, wadding for the middle layer and the only fabric I had enough of for the actual background was a piece of ivory Dupion silk. Considering how much of that is going to be covered by the triskele, it seems a waste of time and materials to cover it with embellishments. It is better to embellish once the triskele is on.
What I don't have is enough Vliesofix to fuse the silk to the wadding, hopefully I can get that at Twilight Craft today.
Meanwhile there is plenty I can do: get the triskele ready to fuse on, start working with the elements. Thank goodness I have enough printable cotton!
I am now at the stage where I am happy to let the piece design itself.
What it means is that I take it the way it wants to go. For example, the decision which fabric to use for the background is simply based on a choice between the fabrics I have enough of. No agonising, no racing to the shop to buy another fabric.
The hard decisions are made, now comes the fun part!

Sunday, January 31, 2010

I've got to decide on the base now

I need a base on which to put a background first, then the triskele.
I've got Peltex, which is really firm, but I only bought enough to make the finished square 30".
Oooohhh....another decision made: it will be a square!
I would prefer a circle, but a circle is too difficult to hang well.
If the base is 30", the triskele has to be about 25" across. I've printed the tiled design out 3 times now!!!
But: if I don't use the Peltex, but a normal quilt sandwich, I have no restriction on the size.

The background

The base is the structure, the background is what you see behind the triskele, it is placed on top of the base.
I want it to look as if I had glued music fabrics on it, put white paint over it, then wiped the paint off, exposing the fabric in messy streaks.
 

These are the music fabrics. I am thinking....bleaching....covering with sheer fabrics.....fraying......

Saturday, January 30, 2010

Triskele

Designing a colour scheme or palette isn't something I can do in an abstract way.
And even if I could, I wouldn't necessarily have fabrics in those colours. While a design such as Fandance needs to be worked out exactly, works such as this one can be created intuitively.
Remember how my patchwork fabrics are organised in boxes by colour?
Well, those are the cottons. I also have a couple of huge boxes with satins, laces, velvets, silks etc.
There was no other way to do this: all the fabric had to be pulled out of the boxes and I separated those colours and shades I thought would work. I had already decided to use soft colours to represent the dreamy quality of the piece.
 

The fabrics on the left have a gold cast, but are in fact a true grey.
The one in the left bottom corner is what is left of a fabulous beaded evening jacket I bought in an op shop for less than $15! I am so hoping I have enough to use that for the spiral that will become the focal point.
Close up: 


 This was the first Triskele (triple spiral) I considered. I printed it out tiled over 12 sheets of paper and stuck them together.


This one is simpler, but has as much or more impact. It will be placed on top of the background and then the other elements will be placed over that in such a way, that the triskele will still not only be visible, but pull everything together.

I decided to make it 30" and at this stage, I don't know yet what the base/background will be, but probably it won't be canvas.
What I like about the Triskele is that this design has been used throughout the history of mankind, with lots of meanings at different times and different civilizations.
I love to use symbols.